
How to Play Harmonica in 15 Steps | Beginner Harmonica Lessons
Updated: Mar 28

Hello, Liam here at LearnTheHarmonica. I couldn't find a complete beginner harmonica guide online so I decided to write one myself!
The harmonica is really easy to pick up and play straight away, but there are some important things you need to do to get the most out of the instrument from the start. Here's my 15 step beginner lesson to get you on the right track. I hope you find it really useful!
How to Play Harmonica in 15 Steps: Beginner Harmonica Lessons
Step 1: Choose the right harmonica
The first thing you need to do is to get hold of a harmonica, obviously! Most beginners start with a 10 hole diatonic harmonica (I recommend a Hohner Special 20 in the key of C) but the instrument you need actually depends on what kind of music you want to play.
Let's look at some of the most common types of harmonica and what they're useful for:

The diatonic harmonica is probably what you think of when you think of a harmonica. It's probably what you'll start with and it's what the rest of this lesson assumes you are playing on. This is the harmonica that Bob Dylan, Neil Young and Bruce Springsteen play, and you may have noticed them in Western movies or heard them on the radio. They have 10 holes and are built to play a major diatonic scale, hence the name. You can find extra notes with bending (explained in Step 7) and play other scales by using positions (explained in Step 8).

The chromatic is the type of harmonica played by both Stevie Wonder and Larry Adler. It has a button or "slide" on the end which lifts each note by a semitone (halfstep). This gives you all the notes of the scale - the chromatic scale, hence the name. These notes make chromatic harmonicas more versatile but it does mean they lack the rich, bluesy sound of a diatonic.

Tremolo and octave harmonicas have two rows of notes, tuned ever so slightly apart (or an octave apart) so that they produce a beating effect. They are tuned to play simple melodies and are very popular in Asia and with Irish folk musicians.
There are more varieties of specialist harmonicas avaialble, including bass and chord harmonicas, and it's also possible to get minor tuned harps or even more weird and wonderful custom tunings as well. Click here to learn more about the diffferent types of harmonica.
So, What Harmonica Do I Recommend For Beginners? The easiest place to start, as I said above, is with a 10 hole diatonic in the key of C. I recommend the Hohner Special 20. Here's an Amazon link.
Step 2: Breathe life into the harmonica
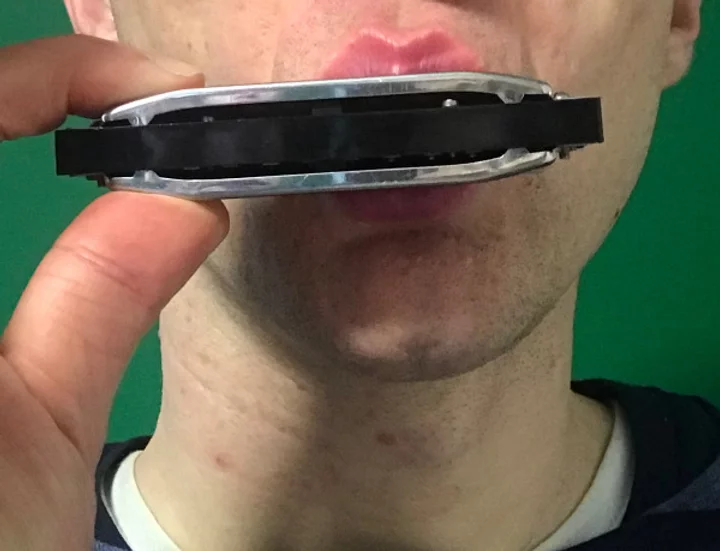
Now you've picked yourself a harmonica, it's time to start playing! Hold the harmonica in your left hand with the numbers on the top - hole 1 on the left (the lowest note) and hole 10 on the right (the highest). Put the harmonica to your mouth. First off, all you should do is breathe in and out without changing your mouth shape. You should naturally be able to cover holes 1, 2 and 3 without any effort. Gently let your breath come in and out, in and out, in and out. You'll get different sounds on the blow and draw. Don't worry about it sounding messy. The important thing at this point is to have a controlled and relaxed breath with as little tension as possible. Drop your shoulders and relax your throat, and let your tongue rest gently in your mouth.
Do you feel out of breath or full of air? If so, you need to work on getting an equal balance of air. Try to match the amount of air going out with the amount of air going in each time. Remember that you're breathing, not heaving. If you are relaxed enough, you should be able to keep playing forever.
I'm working on embedding demos on this page - please follow link for now. Thanks!
Step 3: Start chugging rhythms
Now we'll start chugging. Chugging is when you play multiple in a rhythmic way. We'll be using holes 1, 2 and 3 like we did in Step 2. The way you'll create the rhythm is by using your tongue. Flick your tongue up and forward on the draw breath to create a sort of "AH-DUH" sound, and then do the same on the blow, to create that same "AH-DUH" effect. You don't need to verbalise the "AH-DUH" using your vocal cords, it's enough just to flick your tongue to stop the airflow momentarily. Try to keep this going, remaining relaxed as you do so.
I'm working on embedding demos on this page - please follow link for now. Thanks!
Step 4: Play clean notes, Part 1 (puckering)
Without any training, you'll almost certainly get multiple notes when you breathe through the harmonica. This can be useful in some contexts (like chugging) but most of the time you need to play individual holes so that you can play clean and clear melodies.
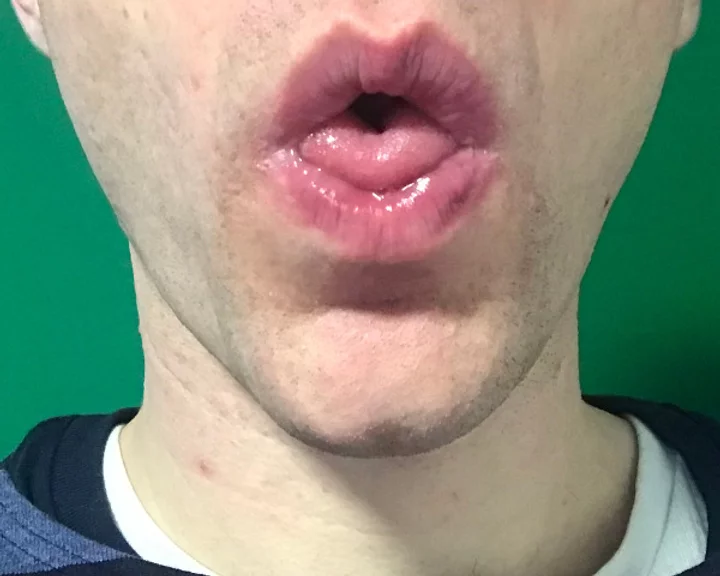
Lip pursing (akaa puckering) is the most common technique for playing clean notes, and it's the method that beginners usually find easiest. It's intuitive because you're trying to narrow your lips so that you isolate a single hole, avoiding the holes either side of the one you're aiming at. You should aim to keep your mouth narrow but without adding any tension with your tongue, cheeks or throat muscles because this can affect the sound of the note. Start by trying to play a 4 hole blow. Remember to stay relaxed. The key to the single note is getting your mouth narrow enough.
On a harmonica in the key of C, you are aiming for the C note. You are listening out for a distinct and clean tone. If it sounds like more than one note, your mouth is too wide. Skip to Step 6 to play a song if you've managed to get a clean note. If not, try the techniues in Step 5.
I'm working on embedding demos on this page - please follow link for now. Thanks!
Step 5: Play clean notes, Part 2 (tongue block or U-block)
If the above method doesn’t work for you, you might want to try one of the following two mouthshapes.
Tongue blocking is the second way you can get clean notes. It isn't usually as accessible for beginners but you may find that it works for yu. It is also an important technique if you want to use tongue textures later on.
To tongue block, make your mouth the width of four holes. Put the harp to your mouth and you should hear roughly four notes at the same time (a bit wider than for chugging). Take the harp away from your mouth and practise putting your tongue forward and to the left - towards the low notes. Put the harp to your mouth again and search for hole 1 with the tip of your tongue. You are aiming to play hole 4 out of the right hand side of the mouth. Again, it should be a clean, clear note with no other tones creeping in.
I'm working on embedding demos on this page - please follow link for now. Thanks!

U-blocking is, in a sense, a hybrid of lip pursing and tongue blocking. You will need a relatively narrow mouth - but not quite as thin as a lip purse - but you'll also be using your tongue. As the name suggests, your tongue should be in a 'U' shape, which means this option is only available to 50% of the population, who have the gene allowing them to curve their tongue! U-blocking is popular with some folk harmonicists as they can move quickly between holes to play accurate triplets and other fast runs.
Step 6: Play a song
Assuming you've managed to get a clean note, it's now time to play a song! I'm going to tell you how to play the song 'When the Saints Go Marching In'.
The easiest way to play harmonica is using tablature (or tabs for short). These tell you the hole number and the direction of airflow. Positive numbers are blow, negative numbers are draw. Some other symbols are used for more advanced techniques. Click here for a full tab guide. Try playing the following, nice and slow, getting the notes as clean as possible. I have 100's of free tabs on my site - visit the Free Tabs page for more.
4 5 -5 6 4 5 -5 6 Oh when the saints, oh when the saints 4 5 -5 6 5 4 5 -4 Oh when the saints go marching in 5 5 -4 4 4 5 6 6 6 -5 Oh how I want to be in that number 5 -5 6 5 4 -4 4 When the saints go marching in
I'm working on embedding demos on this page - please follow link for now. Thanks!

Step 7: Learn to bend notes
One question that beginners ask all the time is "how do you bend notes on harmonica"? Well, you need to make sure you can play clean notes very asccurately first, but assuming you can do that, I'll give you the basics of bending technique.
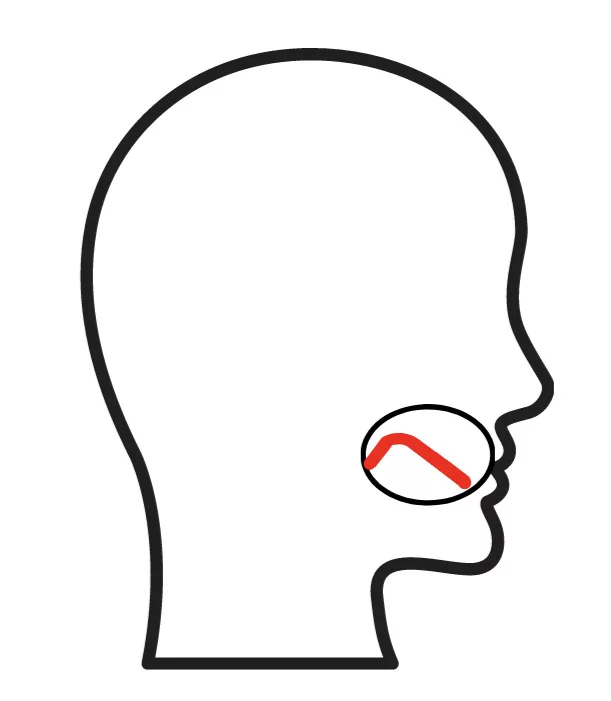
Bending means to change the pitch of a note. On harmonica, we can bend the notes down in pitch, so that they get lower. But not all notes will bend. The easiest one to bend is hole 4 draw. Your 'normal' mouth shape when playing unbent notes should be an "ah" - not too tight and small, otherwise your tone will be bad and accurate bends will be impossible. In order to get the note to bend, gradually shift from "ah" to "oo". Don't let the harp push out of your mouth too far. Next, try to "slurp" the air. Imagine you're drinking milkshake through a straw - it's a similar feeling. Don't yank the air too hard, just increase the pressure and narrow the cavity. Finally, drag the front of your tongue backwards so it humps up in your mouth (see illustration below). The further you go back, the lower the bend you will be able to get. Make the movement very slowly because if you go too far then you'll miss the bend entirely. If you do all these things at once, you should get at least a small bend. If you don't hear a bend, or you get a horrible sound, or no sound at all, the best thing to do is to start again, making the movements as slowly as possible while paying close attention to everything you hear as you do it.
Need more help with your bending? Check out this lesson.
I'm working on embedding demos on this page - please follow link for now. Thanks!
Step 8: Intro to positions
If you've reached this point, you need to know about positions. I'll try to keep this as simple as possible because it can confuse beginners.
Let's go back to basics. Notice that your harmonica has a key printed on it - if it's a C harp, it will say C on it somewhere. As we learned in Step 1, diatonic harmonicas are intended to be played in one key only. However, it is possible - and sometimes - preferable to play your harmonica in a different key from the one it was designed for.
Why would you do this? First, it helps you to play scales other than the basic major scale. Second, it can give you more expressive sounds, like the ones you hear in blues or country music.
We can use two things to achieve this: first, a knowledge of how different scales are related to each other; and second, bending (and later, overblowing) technique.
In theory, you can play your harmonica in 12 positions - i.e. use it to play in the 12 different keys of the musical scale - but this is extremely advanced. Most harp players use the three most useful positions: 1st, 2nd and 3rd. We will look at each of these, plus 4th and 12th positions as well.
Let's start with the basics. If you've reached this far, you've already played in first position because the tab in Step 6 was in first position. This is using the harp for its intended purpose, e.g. playing your C harp to play in the key of C. This is popular for folk songs, pop songs and simple melodies like nursery rhymes, but it's pretty limited beyond that.
Step 9: Second position
Second position is a fifth up from the home key of the harp, so you'd use a C harp to play in the key of G. This position is most useful for blues music because it produces really gritty playing, using bends to expand the expressive capacities of the instrument. It's also useful for country, pop, rock and certain types of folk music. Your new 'home' note is the 2 draw. To get a feel for second position, play the following notes:
-2 -3 4 -4 5 -5 6
I'm working on embedding demos on this page - please follow link for now. Thanks!
Step 10: Third position
Third position is a fifth up from second position. On a C harmonica, it is the key of D. It naturally lends itself to playing dark, moody melodies so it's very useful for playing in minor keys. Your new 'home' note is the 4 draw. To get a feel for third position, play the following notes:
-4 5 -5 6 -6 -7 7 -8
I'm working on embedding demos direct on this page but please follow link for now. Thanks!
Most players only ever use the first three positions, so feel free to skip to Step 13 if you've had enough theory for today. If you'd like to learn a few more positions, go to Step 11.
Step 11: Fourth and fifth positions
Fourth position is a fifth up from third position. On a C harmonica, it would be in the key of A. Your new 'home' note is the 6 draw. You can use fourth position to play a minor scale without any bending at all:
-6 -7 7 -8 8 -9 9 -10
For this reason, it's a popular beginner position for minor keys, although it's not as expressive as using third position with bends.
Fifth position is a fifth up from fourth position (getting the idea now?). On a C harmonica, it would be in the key of E. Your new 'home' note is the 2 blow. This position is also useful for minor keys, but it's not as common as third or fourth.
Again, fee freel to skip to Step 13 if you've had enough of positions. Go to Step 12 to learn about one more position!
Step 12: Twelfth position
I want to mention one more position, and in the process help you understand something deeper about positions more generally. At this point, you might expect me to tell you about the next position along - sixth position. However, I'm not going to. Look at the diagram below and I'll explain why.

This is a circle of fifths. It can be a useful tool for understanding positions. We will take C (at the top) as our home key. Notice that as we move around clockwise, we get G (2nd position), D (third position) and A (fourth position). As we go further and further round the circle, we get further away from C. But after we reach Gb/F# at the bottom, something interesting happens. Because it's a circle, we then get closer and closer to C again. This means that the keys in the top left - Eb, Bb, and F - are actually closer to the home key of C. So for this reason, I'm going to introduce 12th position. This is using a C harmonica to play in the key of F. It can be useful for playing major, bright, confident melodies, but with more expression and emotion than in 1st position.
Step 13: Create a collection
If you are really starting to get into playing the harmonica, and you want to start playing with other musicians or jamming along to songs, you will keep some harmonicas in different keys. I have assumed you started with a C harp. Beyond that it can be useful to get the following keys. These are the most common keys for harmonica playing:
C, D, E, F, G, Bb, Eb
Step 14: Keep your harmonicas clean
So you've started a harmonica collection. It's extremely important to keep your harmonicas clean. You'll notie that dust, saliva and unidentified horrible objects (UHO's) will get stuck in your harmonica. This may not affect your playing at first, but over time it will. The single most effective way of keeping your harmonicas clean is brushing your teeth before playing, and only drinking water while playing.
Easy Clean
You can give your harmonica a quick clean by blowing and drawing a little harder than usual, tapping either side of the harp on your hand, and then running it under a water tap, then finally tapping it on your hand again. This should get rid of any loose particles inside.
Deep Clean
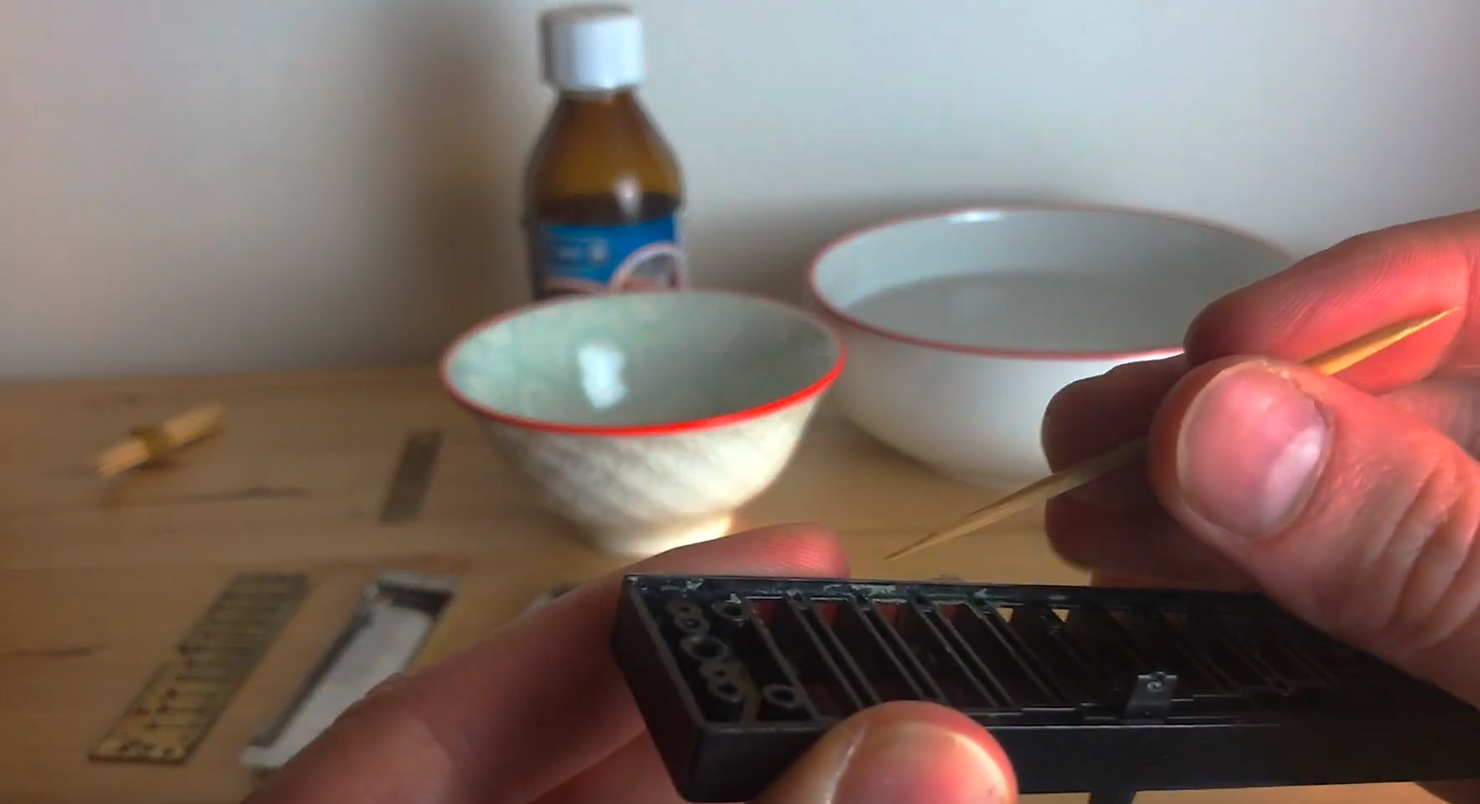
If the easy clean doesn't work, you can dissemble your harmonica to give it a deeper clean. You will need to take the cover plates off, then separate the reed plates from the comb (the wooden or plastic centre of the instrument). Usually this is a simple procedure requiring only a screwdriver and a little patience. Once it's dismantled, I'm pretty old school so I use a toothbrush and rubbing alcohol to sterilise each part, but lots of people just place theirs in an ultrasonic cleaner to do the job for them. Then you just put the instrument back together and enjoy your clean harmonica!
I highly recommend watching this cleaning video to make sure you do it safely and effectively.
Step 15: Stay motivated!
Well done for reaching the final step of this lesson. The most important thing you can do right now as a beginner harmonica player is this: keep yourself motivated! That might be through listening to inspirational music, going to jam nights or playing with friends. My online harmonica school is a great way to keep motivated and focused while learning fun skills and meeting other harp players from all over the globe. Why not take a free trial today? I hope to see you soon!
Reach the Next Level with my Online Harp School
If you are keen to improve your playing, start your free trial of my harp school today.
Recent Posts
See AllHarmonica YouTube shorts to help busy people learn harmonica easily, wherever they are!


.png)
.png)
.png)